
Stencils are an indispensable component in every crafter’s arsenal. They allow us to produce crisp and consistent patters again and again over a variety of surfaces. However, sometimes even amongst the vast array of commercial stencils, we can’t seem to find a design that meets our needs. The obvious solution is to design and cut our own, but how? I have been designing and making stencils for my work for the past 2 years now, and today I’m going to share all the tips and tricks I’ve picked up along the way.
Step 1: Decide The Subject Of Your Stencil And Make A Preliminary Sketch
The first step in designing a stencil is to chose the subject you are going to base your design on. The choice is vast, from plants and animals to geometric patterns. Whatever subject you choose should have a recognizable silhouette. Even if you are planning a detailed design, you want your subject easily identifiable from a distance by just its outline. So for example, animals, chose a pose that highlights the animal’s essence. For flowers and other botanicals, pick an angle that showcases the unique trademarks of that flower.
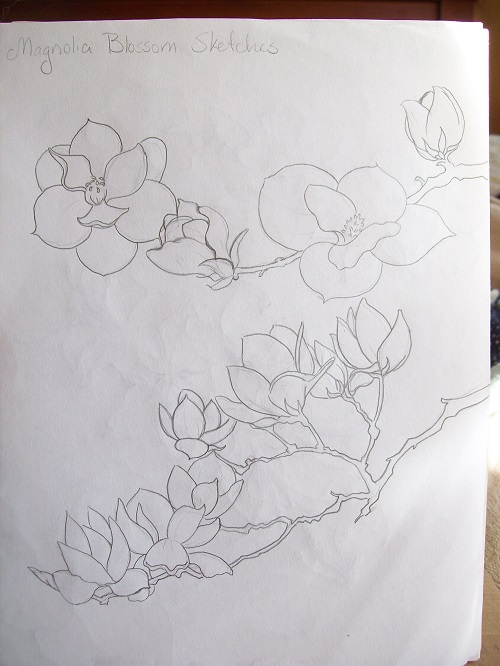
Once you’ve got a basic sketch going, refine it by darkening the main lines. Occasionally holding your sketch away and squinting at it will help you to see if the general shapes are to your liking and revise accordingly. Shown are some of my preliminary sketches for azalea and magnolia stencils. You can see how the lines I want to emphasize have been darkened to show off the forms of the flowers.

Step 2: Translate The Subject Into Stencil Design
Once you’ve decided on the outline and features of your design, it’s time to translate your design into a pattern that can be cut into a stencil. A stencil is essentially holes cut into the stencil medium. That means your design must have enough structural integrity to keep the stencil from falling apart, and care must be taken when thin pieces of plastic will be left between the cuts. Sometimes you just want a plain silhouette like the Running Arabian Horse Stencil. In this case, your job is easy: simply trace your design and cut!
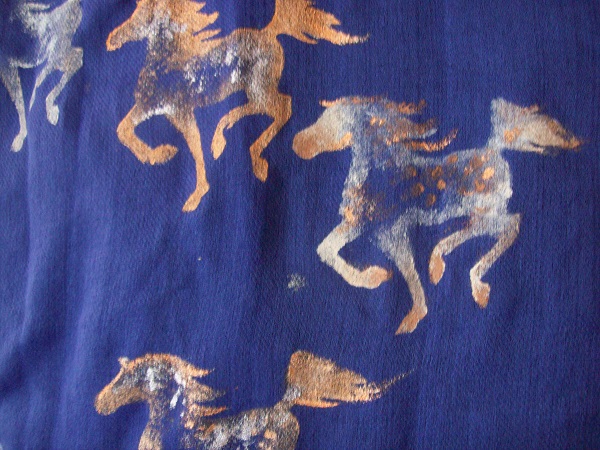
But what if you want a more detailed design? This is where positive and negative space come into play. In art theory, compositions are split into positive space (space with something in it) and negative space (the rest of the space). Since the stencil is such a simplified representation, good use of positive and negative space is essential for showing form. With stencils, the positive space will be the cuts in the stencil film (the open spaces) and the negative space will be the stencil itself and the spaces it blocks the paint on the final product. How you use this is up to your creativity! In the Rearing Arabian Horse Stencil I used positive space, the stencil cuts, to represent the places where the sun would highlight the horse’s muscles. You could also create a stylized design.

Step 3: Transfer The Design To Stencil Film
Now that your design is ready, you need to transfer it to the stencil film. Since most stencil film is just transparent plastic, the simplest way I’ve found to do this is to place the film directly onto the sketch, tape it down for stability, and trace the stencil design on the plastic with permanent marker. You want to make sure you use a permanent marker like a sharpie, because anything else will just uselessly wipe right off.


Step 4: Cutting The Design Into The Stencil Film
Okay, we’ve chosen our design, converted it into a workable stencil pattern, and traced it onto the stencil film. It’s time to cut! For cutting stencils you have 2 options: an X-acto knife or a heat tool. Stencils can also be laser cut, but that isn’t a DIY project so we won’t be talking about it here. The X-acto knife is the tool you’ll probably be using to cut your stencils. These are affordable, easy to find, and simple to use. Simply set the stencil film on your cutting surface and use your knife to trace around the cutting areas. Since it sometimes takes a bit of practice to get a feel for the technique, start with big shapes, straight lines, or gentle curves until you get the hang of it. The best cutting surface is a self-healing mat (found with the quilting supplies). From my photos, you can see that I tend to use a cardboard cutting surface, which isn’t recommended because it will dull the blade faster. Speaking of dull blades, make sure to use a sharp one. Your blade should slide easily through the stencil film with light pressure. If you have to push down hard, or saw through the plastic, the blade is too dull (ask me how I know 🙂 ). Also, these things sometimes break and go flying in any direction, so eye protection is a wise precaution when using X-acto knives (again, ask me how I know 🙂 ).
An alternative to cutting with a blade is to use a heat tool.

These tools operate by using a very high temperature to melt right through the plastic. I’ve been using the Martha Stewart Multi Purpose Heat Tool (proper review coming soon!) for a short time now and have found it an interesting alternative. The heat tool also has a slight learning curve to get the technique right: leave the tip in one spot too long and you’ll melt away far more plastic than you want. I recommend practicing on a throwaway piece until you get the hang of it. The packaging recommends using this tool over a glass surface (such as a glass cutting board), but I used my trusty cardboard on top of my ironing board and didn’t have any problems. The downside of cutting plastic with heat is that it leaves a rather uneven melted edge (this can easily be smoothed out with an ordinary Emory board),

and, of course, fills the room with the undesirable scent of melting plastic. However, heating tools have a myriad of other uses, so if you’re interested in getting one, go for it!
Well, that’s my complete tutorial on stencil making and design. I hope these tips help you make stencils that allow your creativity to reach new boundaries! I’ll probably be updating this guide from time to time, and adding links to more in-depth pages on specific stencils. Sign up for the mailing list so you don’t miss out! If you have any questions of comments, please leave them below, I love to hear from you!

One thought on “How To Design And Make Your Own Stencils: A Craft Tutorial”